San Jose Bathtub Reglazing Projects: Before & After Case Studies
Real San Jose tub refinishing work, broken down by neighborhood and tub type — what we started with, exactly what we did, what it cost and how long it took. Written by Mark Bellon, lead refinisher. Fully licensed & insured.
Open Mon–Sat 7 AM–6 PM
Direct answer
What does a San Jose bathtub reglazing project look like before and after?
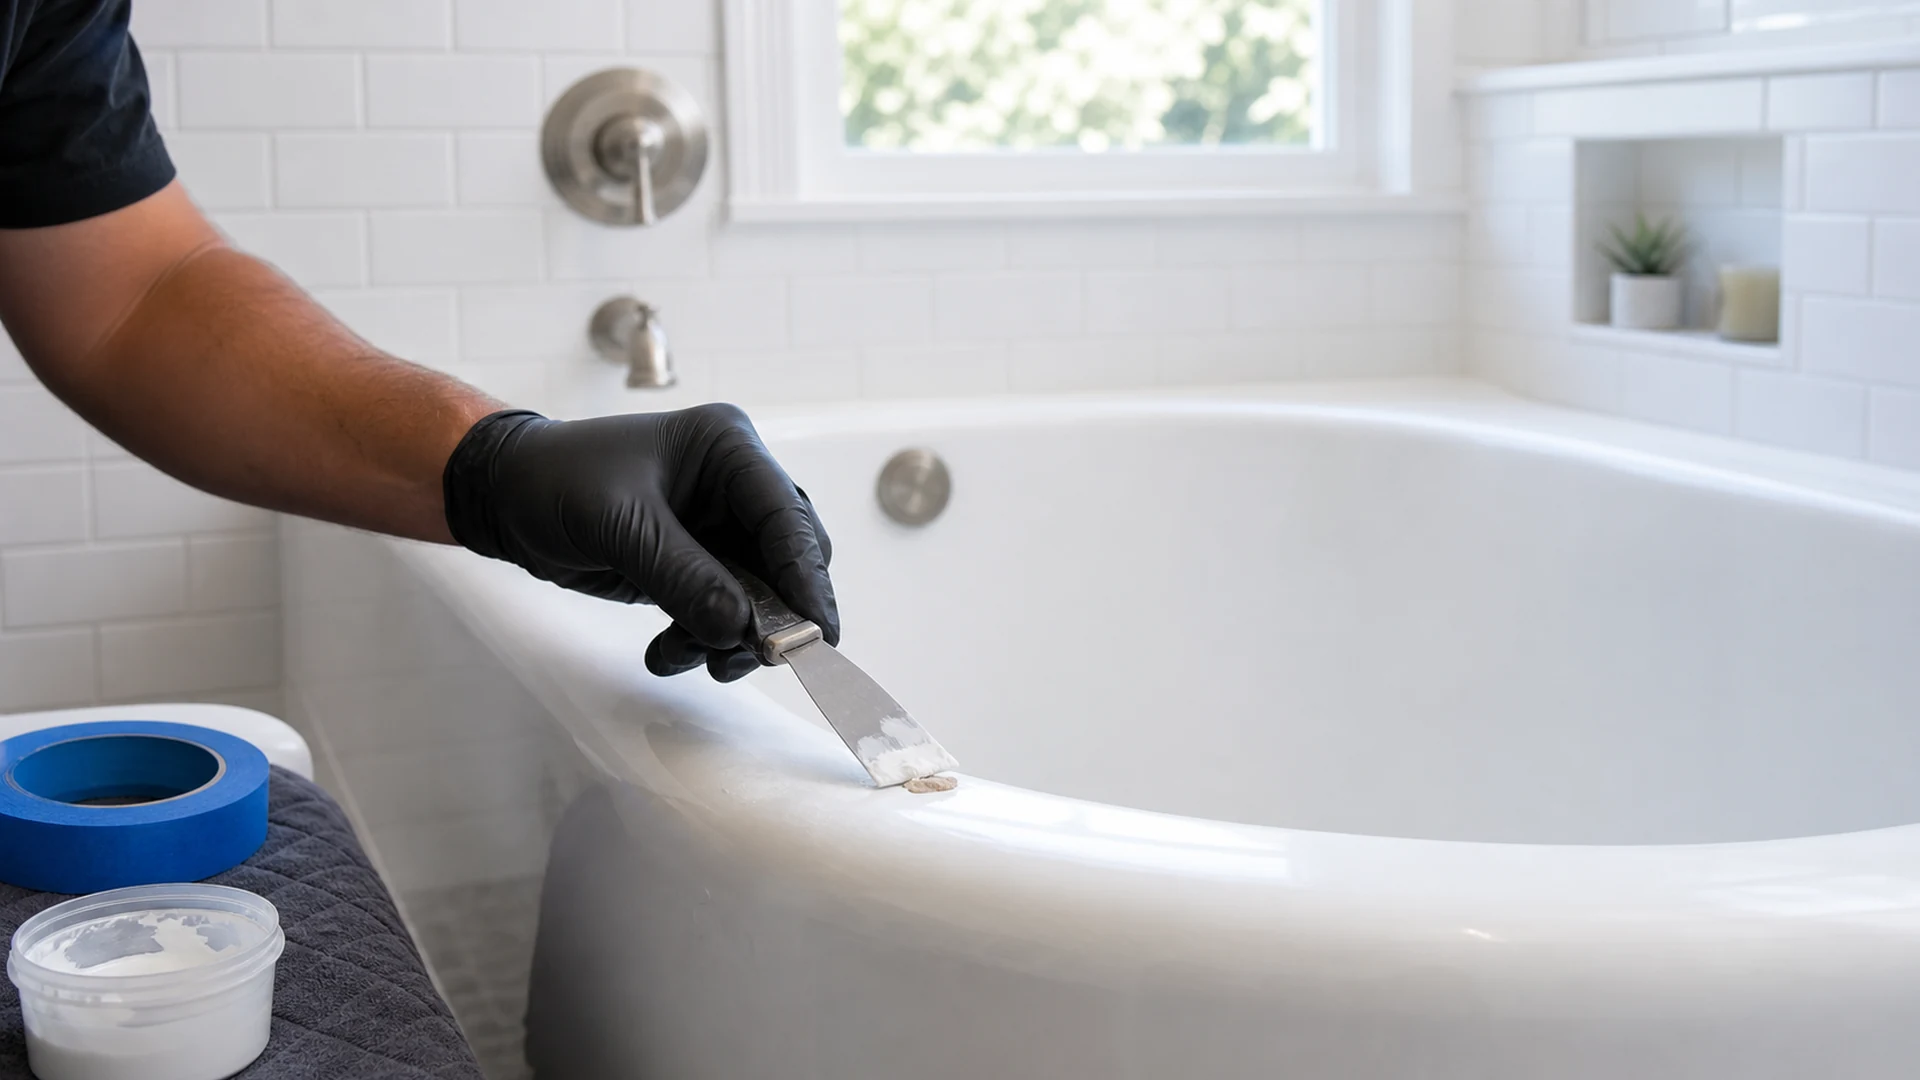
A San Jose bathtub reglazing project takes a sound but worn tub — rust at the drain, chips, crazing or a dated avocado or almond color — and brings it back to a glossy even finish in one visit of 3–5 hours for $725–$895; the work is the same prep-then-spray sequence on every job, only the prep chemistry changes with the tub material. Call (669) 337-6184 or book your San Jose tub project online at nexfield.pro/crm/book for a free same-day quote, Mon–Sat 7 AM–6 PM.
Are these real San Jose jobs?
Each case study below is a representative example of the kind of work we run in that neighborhood and tub type, grounded in 2,840-plus fixtures refinished since 2015. The materials, prep, costs and turnaround are accurate; we do not attach invented customer names or fake dates to them.
How to read these case studies
People deciding whether to reglaze a tub usually want one thing the brochure never gives them: a job that looks like theirs, with honest numbers attached. So instead of one more glamour shot, this page walks through eight kinds of bathtub project we run again and again across San Jose, each tied to a real neighborhood, a real tub material and the real condition it tends to arrive in. For each one I give you the starting problem, the exact prep, how many coats went on, the outcome, the turnaround and a cost range, the way I would explain it standing in your bathroom.
One honest caveat up front. These are not named customers, fabricated testimonials or invented invoice dates. They are representative examples — a typical Willow Glen cast-iron job runs like this, a typical Berryessa rental fiberglass unit runs like that — built from the patterns I see week to week. San Jose housing is heavily postwar, built roughly between 1945 and 1980, so the same handful of tub types and the same handful of problems show up over and over by area. That predictability is exactly why I can quote your tub accurately over the phone. If you want to see the photos that go with this kind of work, the drag-to-compare pairs live on the before & after gallery; this page is the written detail behind them.
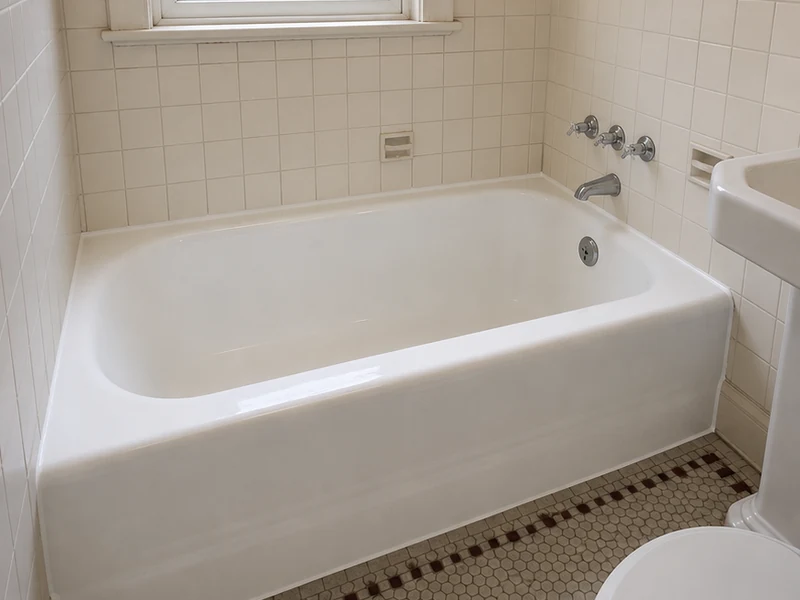
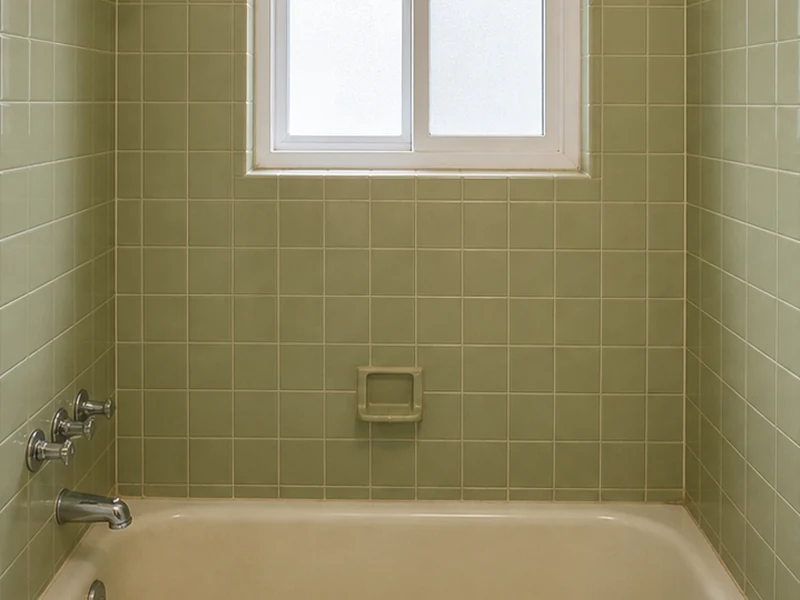
Project 1 — Willow Glen (95125): postwar cast-iron tub, rusted drain
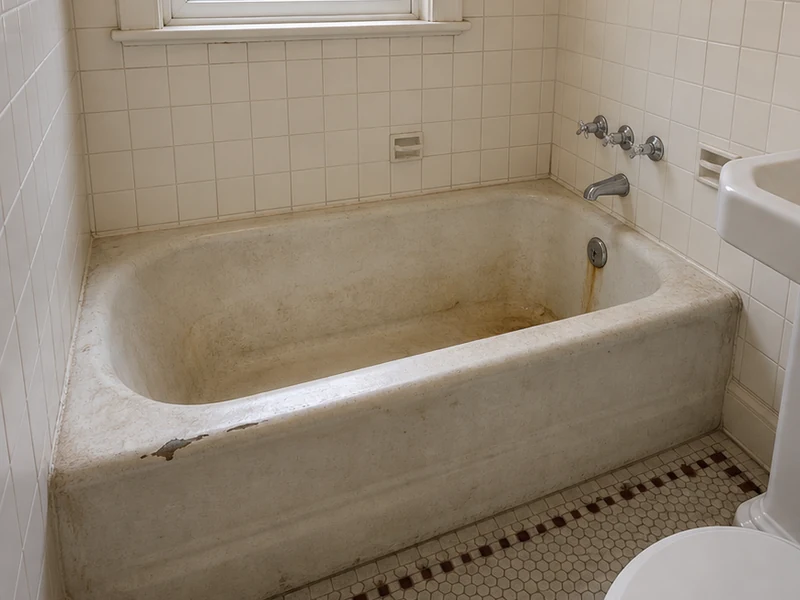
Starting condition. Willow Glen's tree-lined blocks of 1940s and 1950s bungalows still carry their original porcelain-over-cast-iron tubs, and a typical one comes to me with a rust bloom spreading from the drain and overflow, a couple of rim chips down to the iron, and forty years of etched soap film that no cleaner touches anymore. The tub itself is dead solid — cast iron does not rot — it is purely the enamel surface that has failed.
What we did. Mask and ventilate the room, then a deep solvent and abrasive clean to pull every trace of soap film and body oil. Grind back the rust spots to clean metal and treat them so they do not bleed through. Fill the rim chips with a two-part polyester filler, then block-sand them dead level. Acid-etch the whole enamel surface so the bonding primer has tooth to grip, wipe down, lay the bond coat, then spray three thin acrylic-urethane topcoats in white. A correct etch is the entire ballgame on cast iron; skip it and the prettiest coat peels in a year.
Outcome and numbers. The tub comes back glossy and even, drain rust gone, rim chips invisible. Turnaround on a job like this is about 4 to 5 hours on site, ready for normal bathing 24 to 48 hours later. Cost range for a Willow Glen cast-iron tub with this much repair is roughly $795 to $895, toward the top of our band because of the rust and chip work. See porcelain & cast-iron tub refinishing for the full method.
Project 2 — Berryessa (95132): 1980s fiberglass tub-shower rental turnover
Starting condition. Berryessa and the east-side rental corridor are full of 1970s and 1980s apartment stock running molded one-piece gelcoat fiberglass tub-and-shower units. Between tenants a typical one is dull, yellowed, crazed with fine spider cracks across the floor, and stained where the previous tenant gave up cleaning. The shell is intact; the gelcoat is just spent.
What we did. Fiberglass gets a completely different prep from cast iron — no acid, because acid does nothing to resin. Clean hard to strip soap scum and oils, scuff-sand the whole unit to flatten the gloss and kill the crazing, fill any soft spots or stress cracks, then wipe with an adhesion promoter so the primer bonds to the resin. Bond coat, then two to three acrylic-urethane coats in white. Because this is a landlord turnover I keep the schedule tight and coordinate access so the unit is back in the rent-ready rotation fast. We do a lot of these in property-manager reglazing batches.
Outcome and numbers. The unit reads like a new insert went in, without the demolition of pulling a one-piece surround through a doorway. Turnaround is 3 to 4 hours, often several units back to back in one building. Cost range for a single Berryessa fiberglass tub-shower is roughly $725 to $815, near the bottom of our band; batched turnovers price better per unit. More on this in fiberglass & acrylic tub refinishing.
Project 3 — Naglee Park (95112): 1920s clawfoot tub restoration
Starting condition. Naglee Park is a historic district east of downtown with grand older homes, and it hides some genuine 1920s and 1930s clawfoot cast-iron tubs. A typical clawfoot comes to me with the inside enamel worn dull and stained, sometimes a few chips, and an exterior that the owner wants painted a different color than the inside. These are heavy, irreplaceable fixtures — you do not throw one away, you restore it.
What we did. Same cast-iron discipline as Willow Glen, plus the extra care a freestanding tub needs. Clean, grind and treat any rust, fill chips and block-sand level, acid-etch the interior enamel. Then spray the inside and roll/spray the exterior separately so the owner can have a bright white bowl and a soft color or accent on the outside. Three coats inside where the wear happens, two on the exterior. Clawfoots take longer because every surface is exposed and there is no surround to hide an edge. Full detail on clawfoot & antique tub refinishing.
Outcome and numbers. A period-correct tub that looks restored, not replaced, with the character intact. Turnaround is the longest of the residential jobs, about 5 to 6 hours on site. Cost range for a clawfoot restoration is roughly $850 to $1,050 depending on whether the exterior gets a separate color, because it is effectively two finishes on one fixture.
Project 4 — Almaden Valley (95120): tile surround color change
Starting condition. Larger postwar and later Almaden Valley homes often pair a sound tub with a dated tile surround — avocado green, harvest gold or pink ceramic that drags the whole bathroom back fifty years. The grout is grimy and the color is the problem, not the structure. Owners here usually want the tub refreshed and the surround recolored together so the room reads new.
What we did. This is a combined tub-plus-tile project. The tub gets the standard etch-and-spray. The tile surround gets cleaned, the grout lines etched so the bond coat grips both glaze and grout, then a bond coat and acrylic-urethane topcoat sprayed over the whole wall in white — no demolition, no regrouting, no ripping tile off the wall. Recoloring tile in place is the single most dramatic before/after in San Jose because it resets the room without touching the plumbing. See tile reglazing.
Outcome and numbers. Avocado surround and tired tub both come back bright white as one continuous finish. Turnaround is about 4 to 5 hours for the combined job. Cost range runs roughly $1,150 to $1,450 for the tub and a standard tub-surround together, far under a tile tear-out and re-tile that would run several thousand and tie up the bathroom for days.
Project 5 — Rose Garden (95126): porcelain pedestal sink and tub refresh
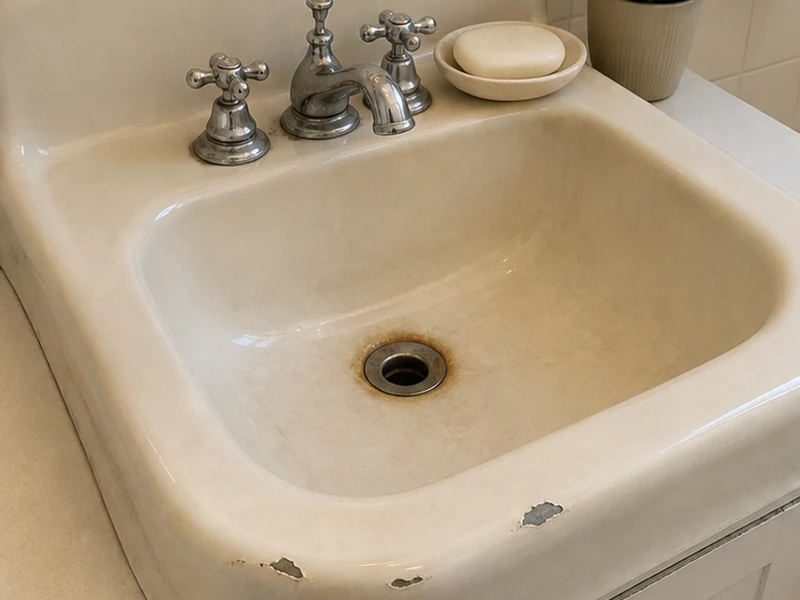
Starting condition. The older homes near the municipal rose garden keep their 1920s-to-1950s fixtures, and a common request is to refresh the tub and its matching porcelain pedestal sink in one visit so they look like a set again. The sink usually has a chip or two at the basin and the same etched, dulled glaze as the tub.
What we did. Tub gets the cast-iron etch-and-spray. The pedestal sink is a small but fiddly fixture: mask the faucet and trap, clean, fill the chips with filler and sand them flush, etch the porcelain, bond coat, then two acrylic-urethane coats. The trick on a sink is keeping the coating off the chrome and out of the overflow while still getting full even coverage on a curved basin. Doing tub and sink together saves a second trip charge. See sink reglazing.
Outcome and numbers. Tub and sink come back as a matched white set, chips gone. Turnaround for the pair is about 4 to 5 hours. Cost range is roughly $725 to $895 for the tub plus about $250 to $350 for the pedestal sink done on the same visit, less than pricing them as two separate trips.
Project 6 — Evergreen (95148): acrylic tub with a chip and crack repair
Starting condition. Evergreen mixes established and newer homes with fiberglass and acrylic tubs. A frequent call here is a tub with a specific failure — a dropped shampoo bottle chipped the floor, or a stress crack opened where the shell flexes — rather than a whole-tub color problem. The owner wants the damage gone and the finish renewed at the same time.
What we did. Repair first, finish second. Open and clean out the crack so the filler keys in, reinforce the underside if the floor flexes, fill with a two-part compound, then sand the patch dead flush so it disappears under coating. From there it is the fiberglass/acrylic route: scuff-sand, adhesion promoter, bond coat, two to three acrylic-urethane coats. A chip repair alone is a quick fix; pairing it with a full reglaze means the patch is invisible because the whole surface is one fresh finish. More on tub chip & crack repair.
Outcome and numbers. Damage gone, whole tub renewed in one finish so there is no visible patch. Turnaround is about 3 to 4 hours. A standalone chip/crack repair runs roughly $150 to $300; combined with a full reglaze the project lands around $825 to $950 depending on the severity of the damage.
Project 7 — Communications Hill (95136): condo tub with a slip-resistant floor
Starting condition. Communications Hill condos and lofts run acrylic and cultured-marble fixtures in tight bathrooms where pulling a tub would mean major disruption. A common ask here, especially in households with kids or older residents, is a reglaze plus a textured non-slip floor — the original tub bottom is glossy and slick and they want safety built in while the coating is fresh.
What we did. Standard prep for the tub material — scuff-sand and adhesion promoter for acrylic. Before the final topcoat, mask the floor zone and broadcast a fine slip-resistant aggregate into the coating so the texture is built into the finish, not a stick-on mat that traps water and peels. Then the topcoats lock it in. The result is a floor with grip you can feel but that still wipes clean. Detail on the dedicated non-slip bathtub coating page.
Outcome and numbers. Glossy renewed tub with a safe, textured floor, done without touching the condo's plumbing or removing the fixture. Turnaround is about 3 to 4 hours. Cost is the standard $725 to $895 reglaze plus a $75 to $95 slip-resistant floor add-on.
Project 8 — Cambrian Park (95124): failed DIY refinish kit stripped and resprayed
Starting condition. Cambrian Park's mid-century steel and porcelain tubs sometimes show up wearing a failed hardware-store refinishing kit — a roll-on coating that skipped the etch and is now peeling in sheets, with the old finish showing through. This is the worst before condition we see, and it is entirely a prep failure, not bad luck.
What we did. The failed coating has to come off completely before anything new goes on, or the new finish just peels with the old one. Strip the loose and bonded DIY layer back to the original substrate, clean, then run the correct prep for the underlying material — etch for porcelain or steel, scuff for resin. Repair any damage the bad kit hid, bond coat, then three acrylic-urethane topcoats. Stripping a failed job is extra labor on the front end, which is why a redo costs more than doing it right the first time. See why on reglazing vs replacement.
Outcome and numbers. A properly bonded, glossy finish that will actually last 10 to 15 years instead of the 1 to 3 a kit gives. Turnaround is about 4 to 5 hours because of the strip step. Cost range for stripping and respraying a failed DIY tub is roughly $850 to $975, the extra over a standard reglaze covering the removal labor.
San Jose bathtub project facts at a glance
- Standard San Jose bathtub reglaze: $725–$895, finished same day in 3–5 hours, ready to use in 24–48 hours.
- Cast-iron tubs with rust and chip repair (Willow Glen, Rose Garden, Naglee Park) sit at the top of the range; clawfoot restorations run $850–$1,050.
- Fiberglass and gelcoat rental turnovers (Berryessa, Alum Rock, Evergreen) sit near the bottom at $725–$815 and batch cheaper per unit.
- Add-ons: slip-resistant tub floor $75–$95; standalone chip/crack repair $150–$300; pedestal sink on the same visit $250–$350.
- Tile surround recolored in place with the tub runs about $1,150–$1,450 together — no demolition, no regrouting.
- 2,840+ fixtures refinished across San Jose since 2015. Fully licensed & insured, 5-year written warranty.
- Book a project: (669) 337-6184, Mon–Sat 7 AM–6 PM, or book your San Jose tub reglazing online at nexfield.pro/crm/book.
What these projects have in common
Look across all eight and the same spine runs through every one: prep decides the result, and the prep changes with the substrate, not with how the tub looks. Cast iron and porcelain get acid-etched. Fiberglass, gelcoat and acrylic get scuff-sanded and an adhesion promoter. Everything gets repaired before it gets coated, and everything gets the same sprayed acrylic-urethane topcoat at the end. A glossy after photo is not the hard part — anyone can lay a shiny coat for a day. Making it still be glossy in twelve years is the etch, the fill and the clean nobody photographs.
The other constant is honesty about the substrate. A tub that is structurally sound but surface-worn is the perfect candidate, and that covers the overwhelming majority of San Jose's postwar housing. A tub cracked clean through the shell, delaminated, or rotted at the floor is a replacement, and I will tell you that on the phone rather than take your money to coat over a problem that will fail. If you are weighing it, the is reglazing worth it page runs the math, and our process walks the full step-by-step. Check the numbers on the pricing page and see the photos in the before & after gallery.
San Jose reglazing projects FAQ
Are these specific named San Jose customers?
No, and we do not pretend they are. Each write-up is a representative example of the kind of job we run in that San Jose neighborhood and tub type, drawn from 2,840-plus fixtures refinished since 2015. The neighborhoods, housing stock, tub materials, prep steps, cost ranges and turnaround times are real and accurate; we just do not attach a customer's name or a fabricated date to them.
How much does a bathtub reglazing project cost in San Jose?
A standard San Jose bathtub reglaze runs $725 to $895. Cast-iron tubs with rust or heavy chip repair sit at the top of that range or slightly above, simple fiberglass units sit near the bottom, and add-ons like a slip-resistant floor ($75 to $95) or a color change are priced on top. Call (669) 337-6184 for a free same-day quote on your tub.
How long do these projects take from start to finish?
Most of the projects on this page were sprayed in a single visit of 3 to 5 hours with no demolition. The tub is dry to the touch in about 24 hours and ready for normal bathing 24 to 48 hours after the final coat cures.
Do you reglaze cast-iron, fiberglass and acrylic tubs the same way?
No. Cast-iron and porcelain enamel get an acid or silane etch so the bonding primer bites into the glass-hard surface. Fiberglass, gelcoat and acrylic skip the acid and get scuff-sanded with an adhesion promoter instead, because acid does nothing to resin. The topcoat is the same sprayed acrylic-urethane on both; only the prep changes.
What is the difference between this page and the before-and-after gallery?
The before-and-after gallery is an image grid with drag-to-compare sliders. This page is the written story behind that kind of work: the neighborhood, the starting condition, the exact prep and number of coats, the outcome, the turnaround and the cost. Read this page for the detail and visit the gallery to see the photos.
Can a worn or stained tub really come back looking new?
A structurally sound tub with surface wear, rust staining, chips or a dated color comes back glossy and even after a correct strip, etch, repair and acrylic-urethane spray. The limit is the substrate: a tub that is cracked through the shell, badly delaminated or rotted at the floor is a replacement, not a reglaze, and we will tell you that before quoting.
Want a project like one of these?
Open Mon–Sat 7 AM–6 PM. Most tubs finish in one afternoon. Fully licensed & insured, backed by a 5-year written warranty. Book your San Jose reglazing online at nexfield.pro/crm/book.